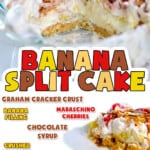
Looking for the ultimate summer dessert? This easy, no-bake banana split cake features a foolproof banana pudding and cream cheese shortcut that sets up perfectly every time. Just layer, chill, and pile on your favorite toppings!
Why You'll Love This No-Bake Banana Split Dessert

Nothing screams summer like an old-school treat, but trying to keep ice cream from melting at a backyard potluck is a nightmare. Enter this easy no-bake banana split cake. It packs all the nostalgic flavors of your childhood favorite into a yummy, scoopable dessert.
Imagine if my popular Chocolate Eclair Icebox Cake and a traditional banana split had a baby - that's exactly what you get here. With a crunchy graham cracker crust, a smooth banana layer, and a mountain of all of your favorite toppings, it's a total crowd-pleaser.
It's just as light, cool, and creamy as my go-to party appetizers, like this quick Pecan Pie Dip. I think you're going to love it!

What is Banana Split Cake?
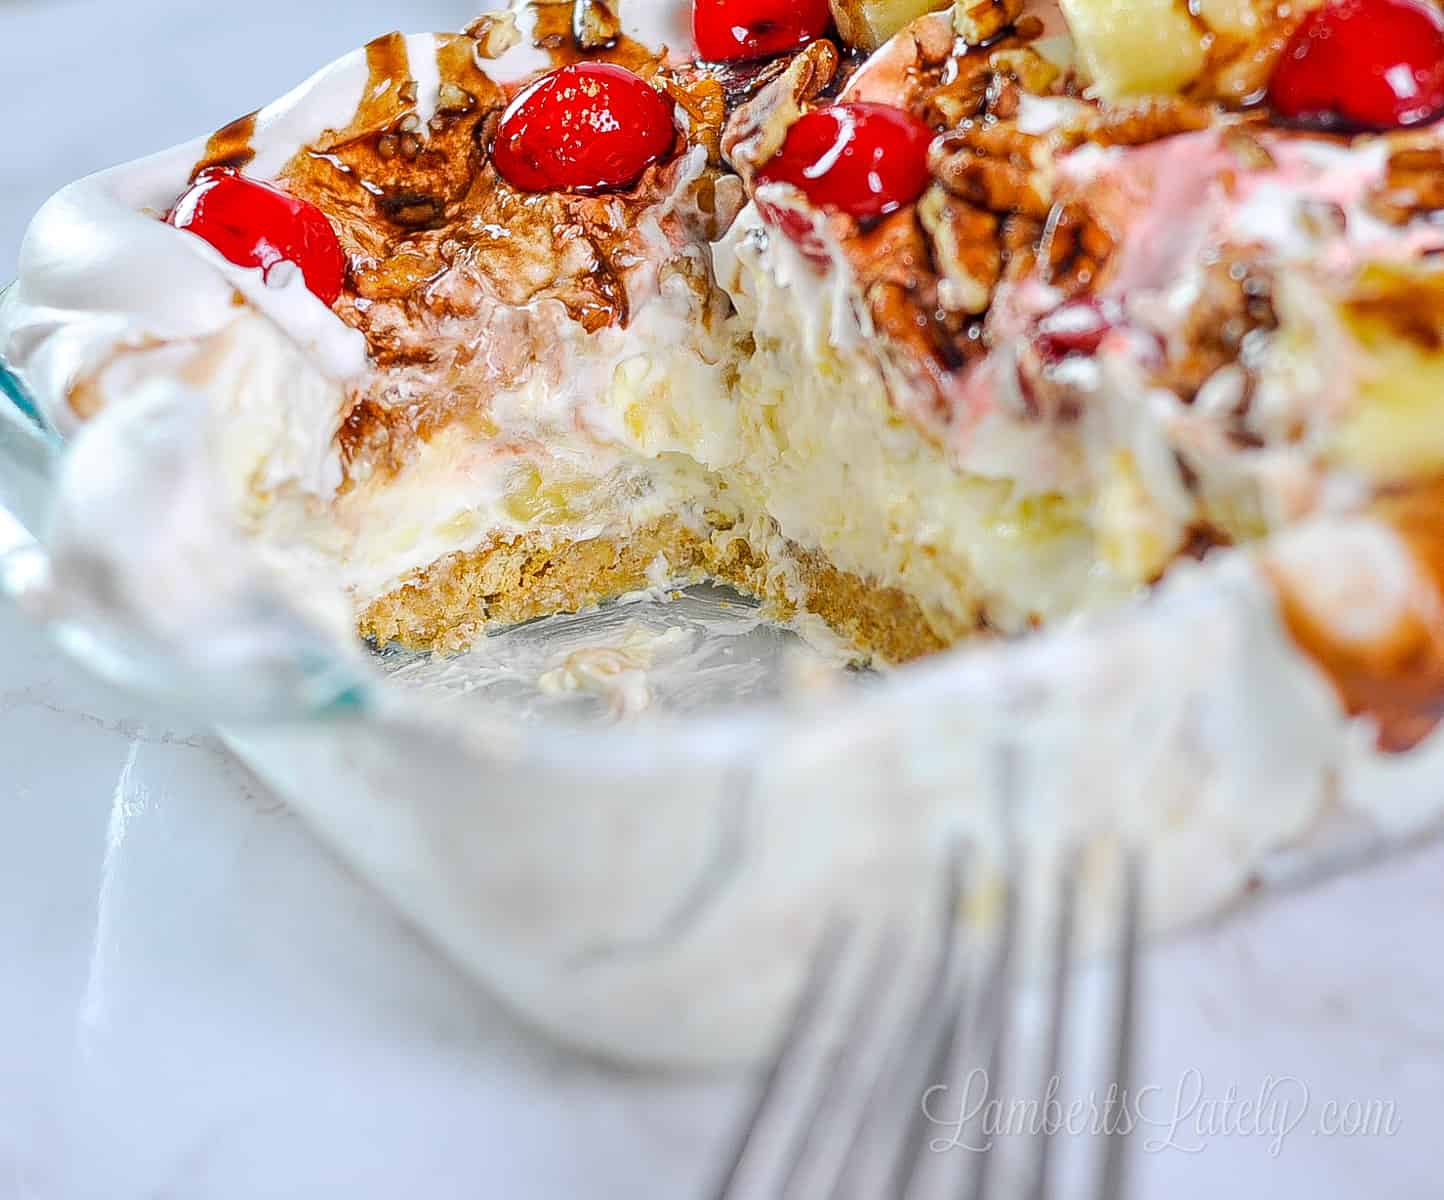
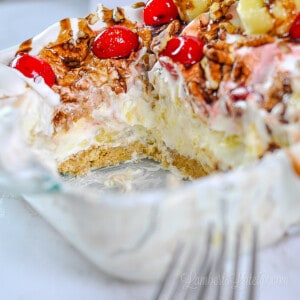
Banana split cake is a layered no-bake dessert inspired by the classic ice cream sundae. It has a creamy banana pudding layer, with pineapple, whipped topping, chocolate syrup, and cherries over a graham cracker crust.
We're going to make this version as easy as possible to make! Some older versions use a complicated egg/butter filling that has to be cooked over the stovetop. Instead, we're making the creamy banana layer with cream cheese and instant banana pudding mix...so simple and works great.
Ingredients & Variations
(See ingredient amounts in the recipe card at the bottom of this post.)
There are several different elements in this cake...it's easiest to break the ingredients down by layer.
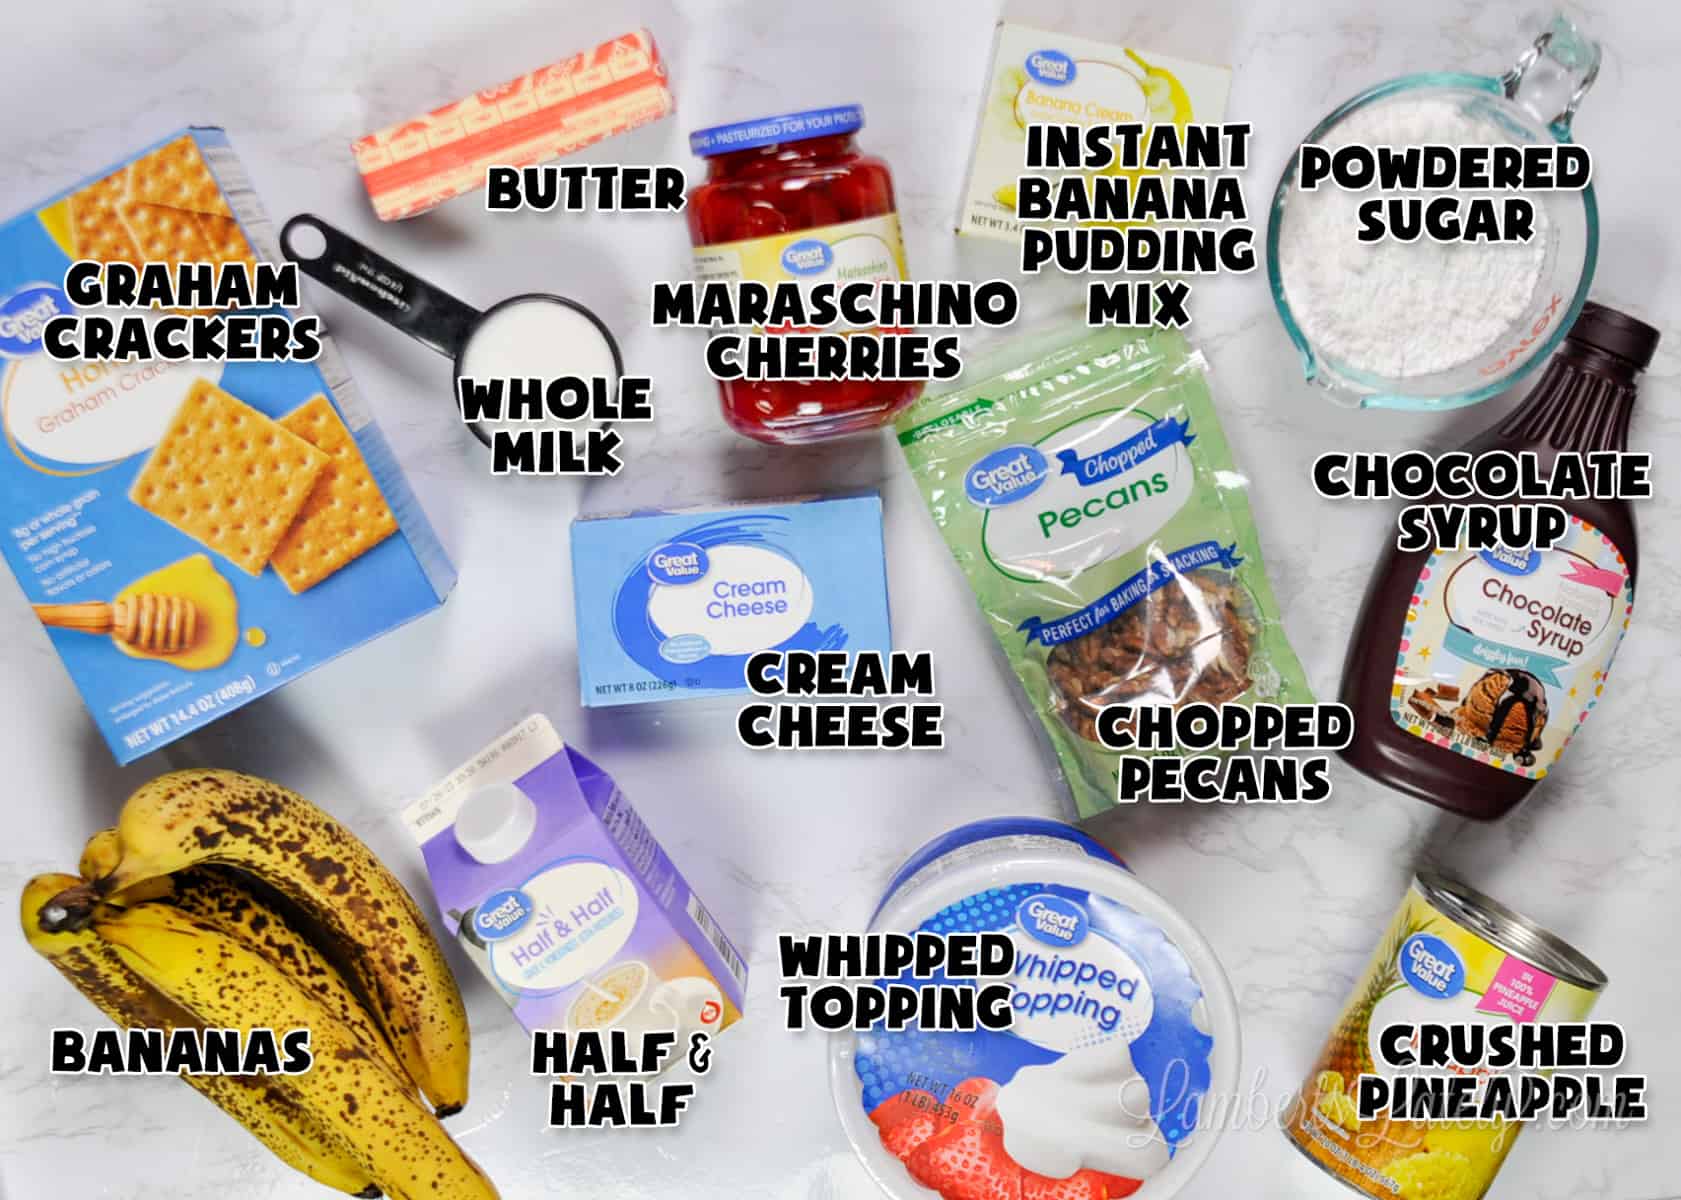
For the Graham Cracker Crust
- Graham Cracker Crumbs: Standard honey graham crackers are my go-to here. Pro tip: If you want to add a fun hint of chocolate to the crust, swap these out for chocolate graham crackers or even crushed Oreos!
- Melted Butter: This is the glue that holds our crust together and makes it taste incredibly rich and buttery.
- White Granulated Sugar: Just a little bit goes a long way to add a tiny bit of sweet crunch to the base.
For the Cream Cheese Banana Pudding Filling
- Instant Banana Pudding Mix: Super important rule here! You must use instant pudding mix for this recipe. If you accidentally grab cook-and-serve, your pudding layer won't set up, and you'll end up with a soupy mess.
- Softened Cream Cheese: I highly recommend leaving your brick of cream cheese out on the counter for about 30 minutes to an hour before you start mixing. Soft cream cheese blends like an absolute dream without leaving annoying little lumps in your pudding.
- Half and Half: Make sure this is nice and cold straight from the fridge to help your instant pudding get beautifully thick.
- Powdered Sugar: Adds just the right amount of sweetness and helps steady our cream cheese mixture.
- Whipped Topping (Cool Whip): This gives the filling its light, fluffy texture. If you're really not a Cool Whip fan, you can totally make your own! You'll just need to whip up roughly 3 cups of homemade whipped cream instead.
- Chopped Bananas: We are folding these right into the cream cheese layer so you get that sweet banana flavor in every single bite.
The Classic Toppings
- Sliced Bananas: Nobody likes brown bananas! Toss your slices in a tablespoon or two of lemon or orange juice before topping the cake to keep them looking nice, bright, and fresh.
- Canned Crushed Pineapple: Drain the juice really well so your dessert doesn't get soggy. I even like to let a paper towel sit on top of the crushed pineapple for an hour or two while the cream cheese layer sets to soak up any hidden liquid.
- Extra Cool Whip: This forms our big, fluffy top layer. Feel free to use 3 cups of homemade whipped cream instead, or swap it out for 2 cups of Marshmallow Creme if you want a thicker, richer topping!
- Maraschino Cherries: Just make sure to drain them well before popping them on top for that authentic, old-school ice cream parlor feel.
- Chopped Nuts: Use whatever you prefer! I love pecans in a no-bake dessert like this, but peanuts are more traditional, and walnuts would be amazing too. Tip: Hold off on adding these until right before serving so they keep their crunch.
- Chocolate Syrup: The ultimate finishing touch! You can also swap this out for a drizzle of caramel, butterscotch, or strawberry syrup (or, let's be real, use them right along with the chocolate).
Flavor Variations and Easy Additions
The absolute best part about this dessert is that you get to be the boss of your own cake! Since it's completely customizable, you can really play around with the flavors to make it your own. Here are a few fun ideas to switch things up:
- Make it Festive: If you are whipping this up for a kid's birthday party or a fun summer potluck, add a generous shower of rainbow sprinkles right on top of the whipped cream just before serving. It looks so festive and completely channels those fun ice cream parlor vibes!
- Switch Up the Berries: Not a fan of maraschino cherries? Swap them out entirely for fresh strawberry slices or even juicy raspberries. It still gives you that bright pop of color and fruitiness without the cherry flavor.
- Go Crazy with Mix-Ins: Want some extra texture? Fold a handful of mini chocolate chips, chopped candy bars, or even toasted coconut directly into the pudding layer before you spread it into the pan.
Looking for more great cool sweet treats? You'll want to try this Pineapple Soft Serve and my Creamy Fruit Dip!
How to Make a Layered Banana Split Cake (Step-by-Step)
Making this dessert is all about the layers! Grab your bowls and let's walk through exactly how to build this showstopper.
Step 1: Prep and Press the Crust
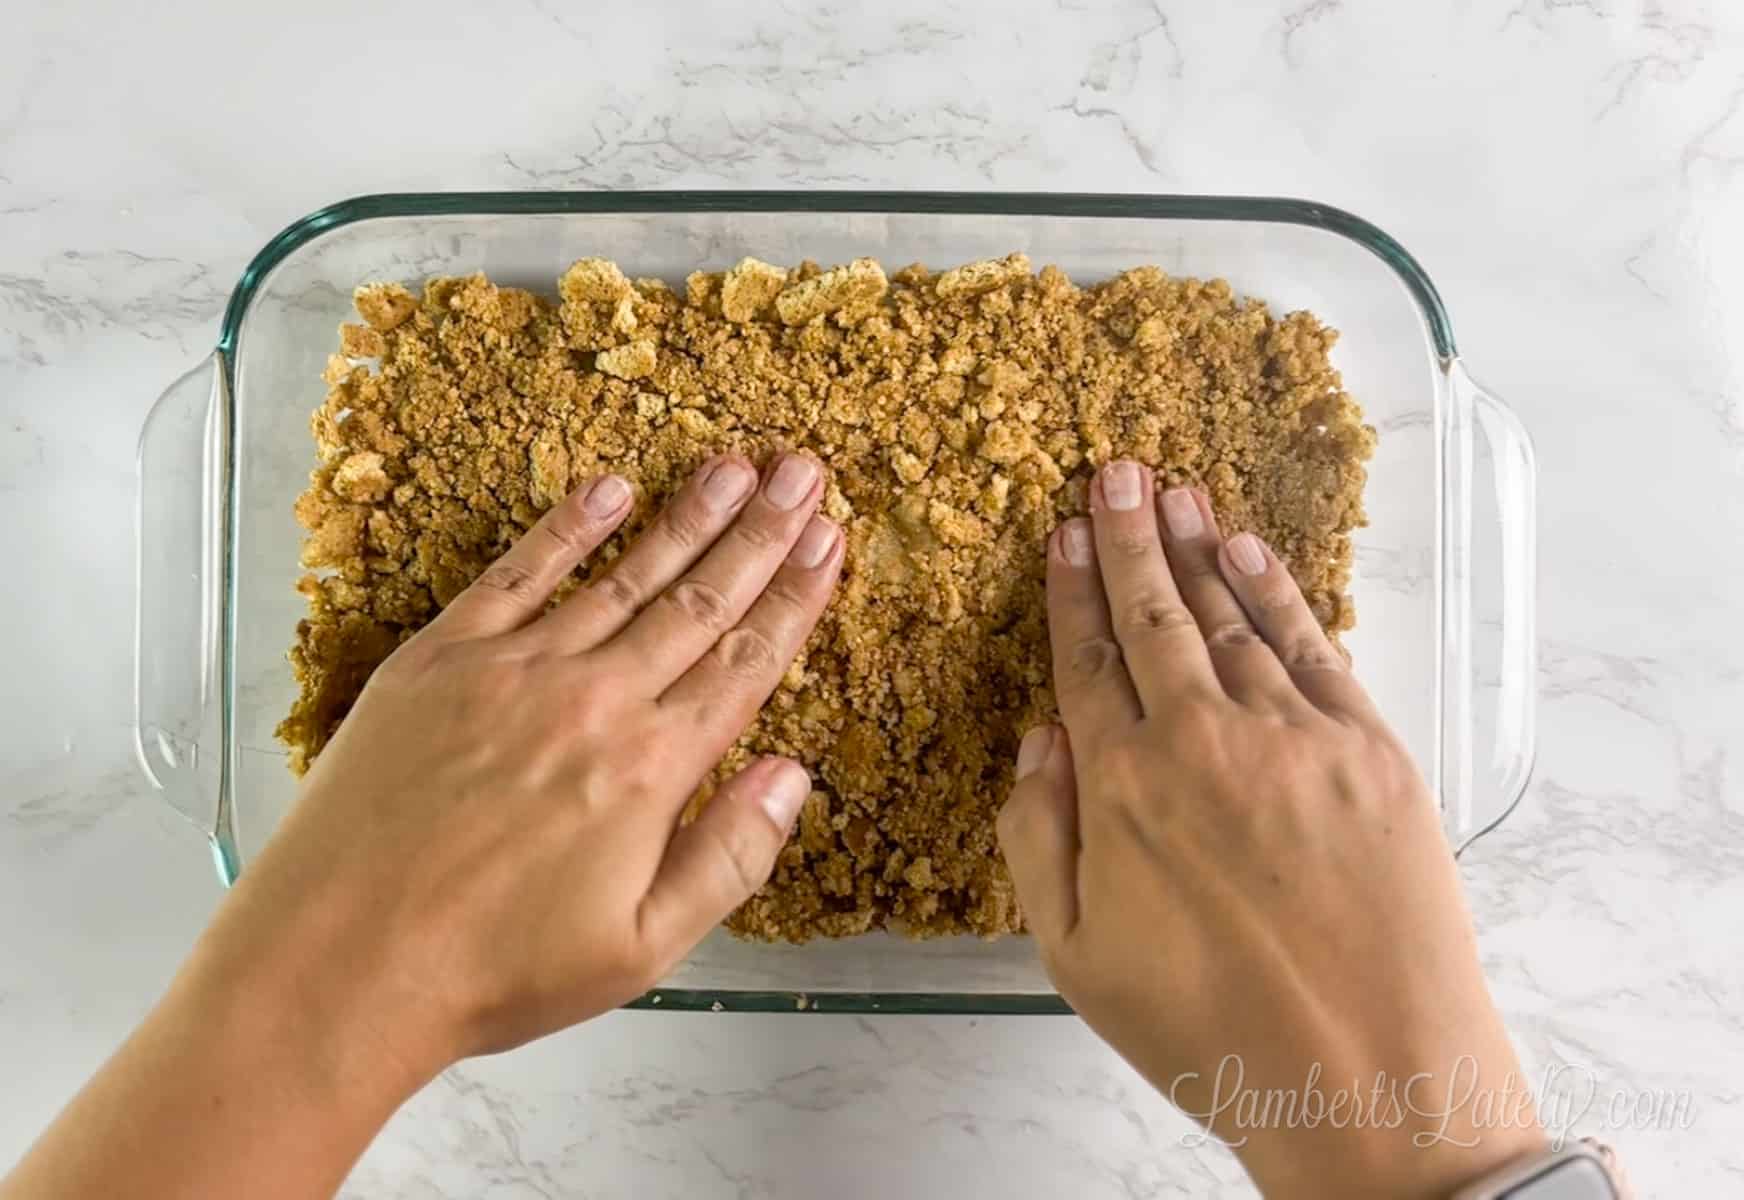
In a medium bowl, stir together your graham cracker crumbs, sugar, and melted butter until it looks like wet sand. Dump the mixture into the bottom of an 11x7" (what I used) or 9x13" baking pan. Use the flat bottom of a measuring cup or your hands to press it down into a tight, completely even layer.
Step 2: Add the Banana Cream Cheese Filling
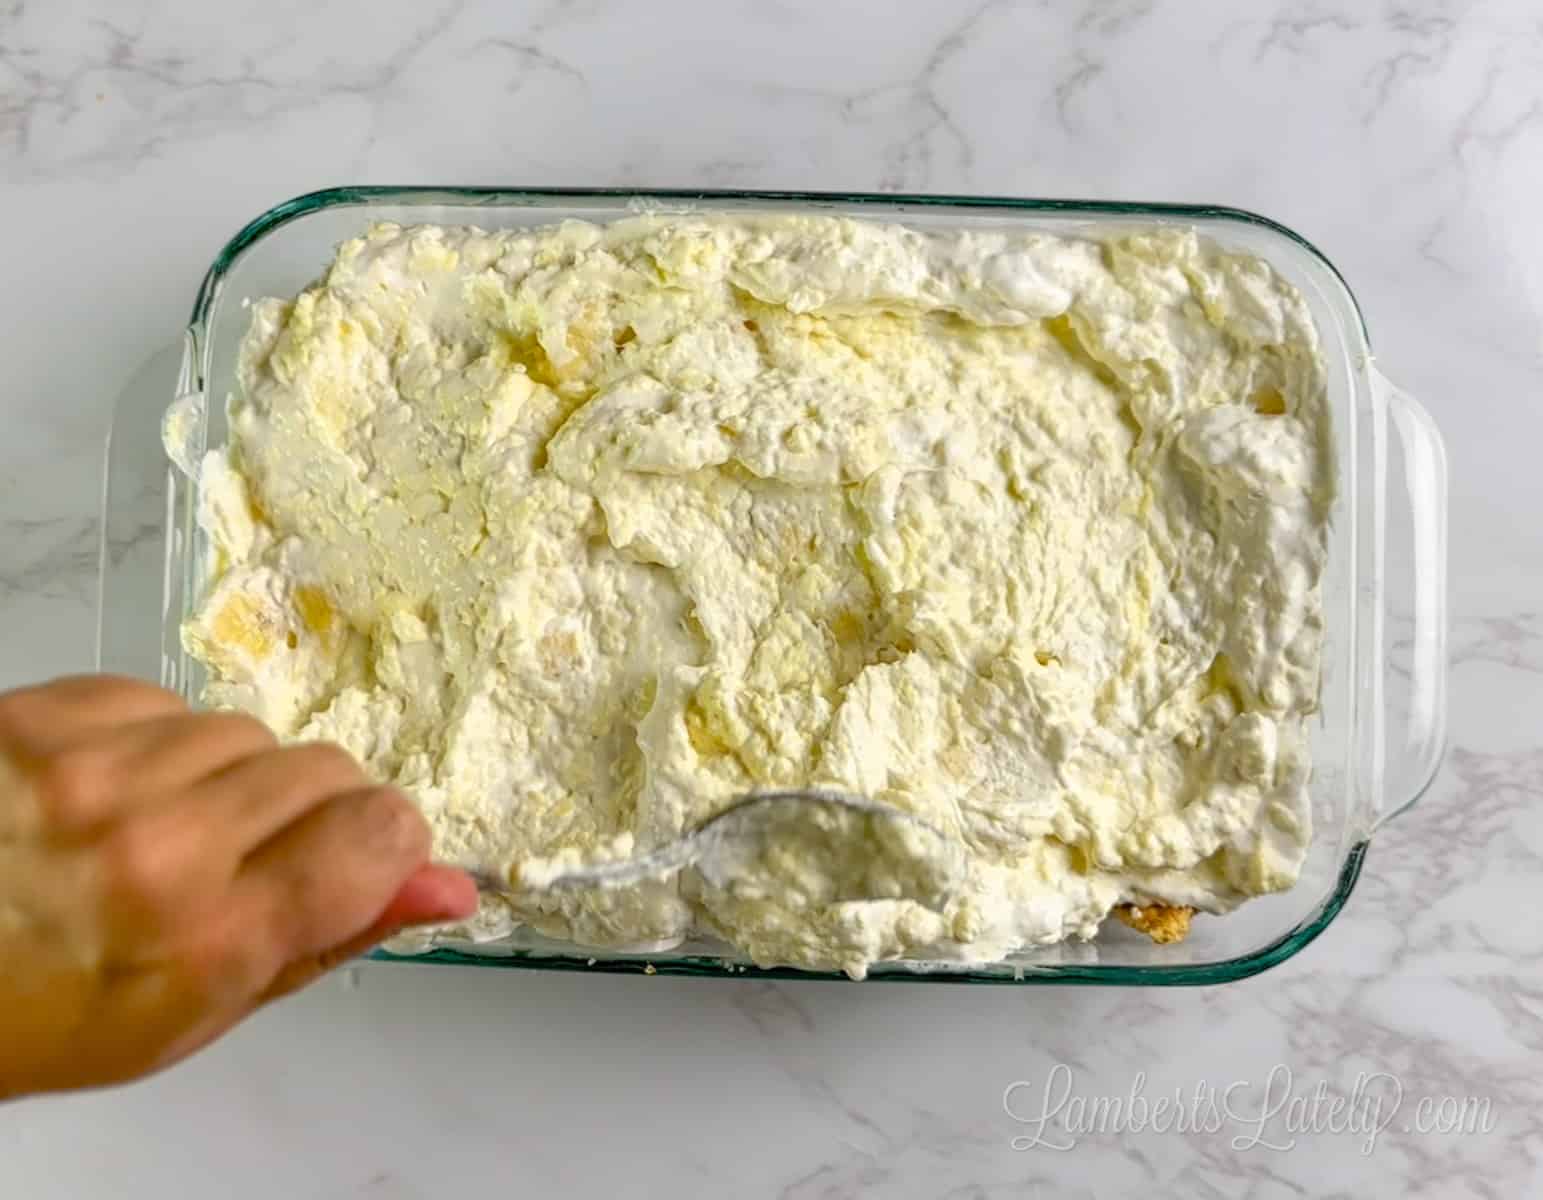
In a large bowl, use a hand mixer on medium speed to blend your instant banana pudding mix, powdered sugar, and cold half-and-half. Once that's smooth, beat in your softened cream cheese until the mixture is completely smooth and lump-free. Gently fold in 8 ounces of Cool Whip and your chopped bananas with a spatula.
Pour this cream cheese mixture right over your graham cracker crust and smooth it out to the edges.
Step 3: Layer and Chill the Dessert
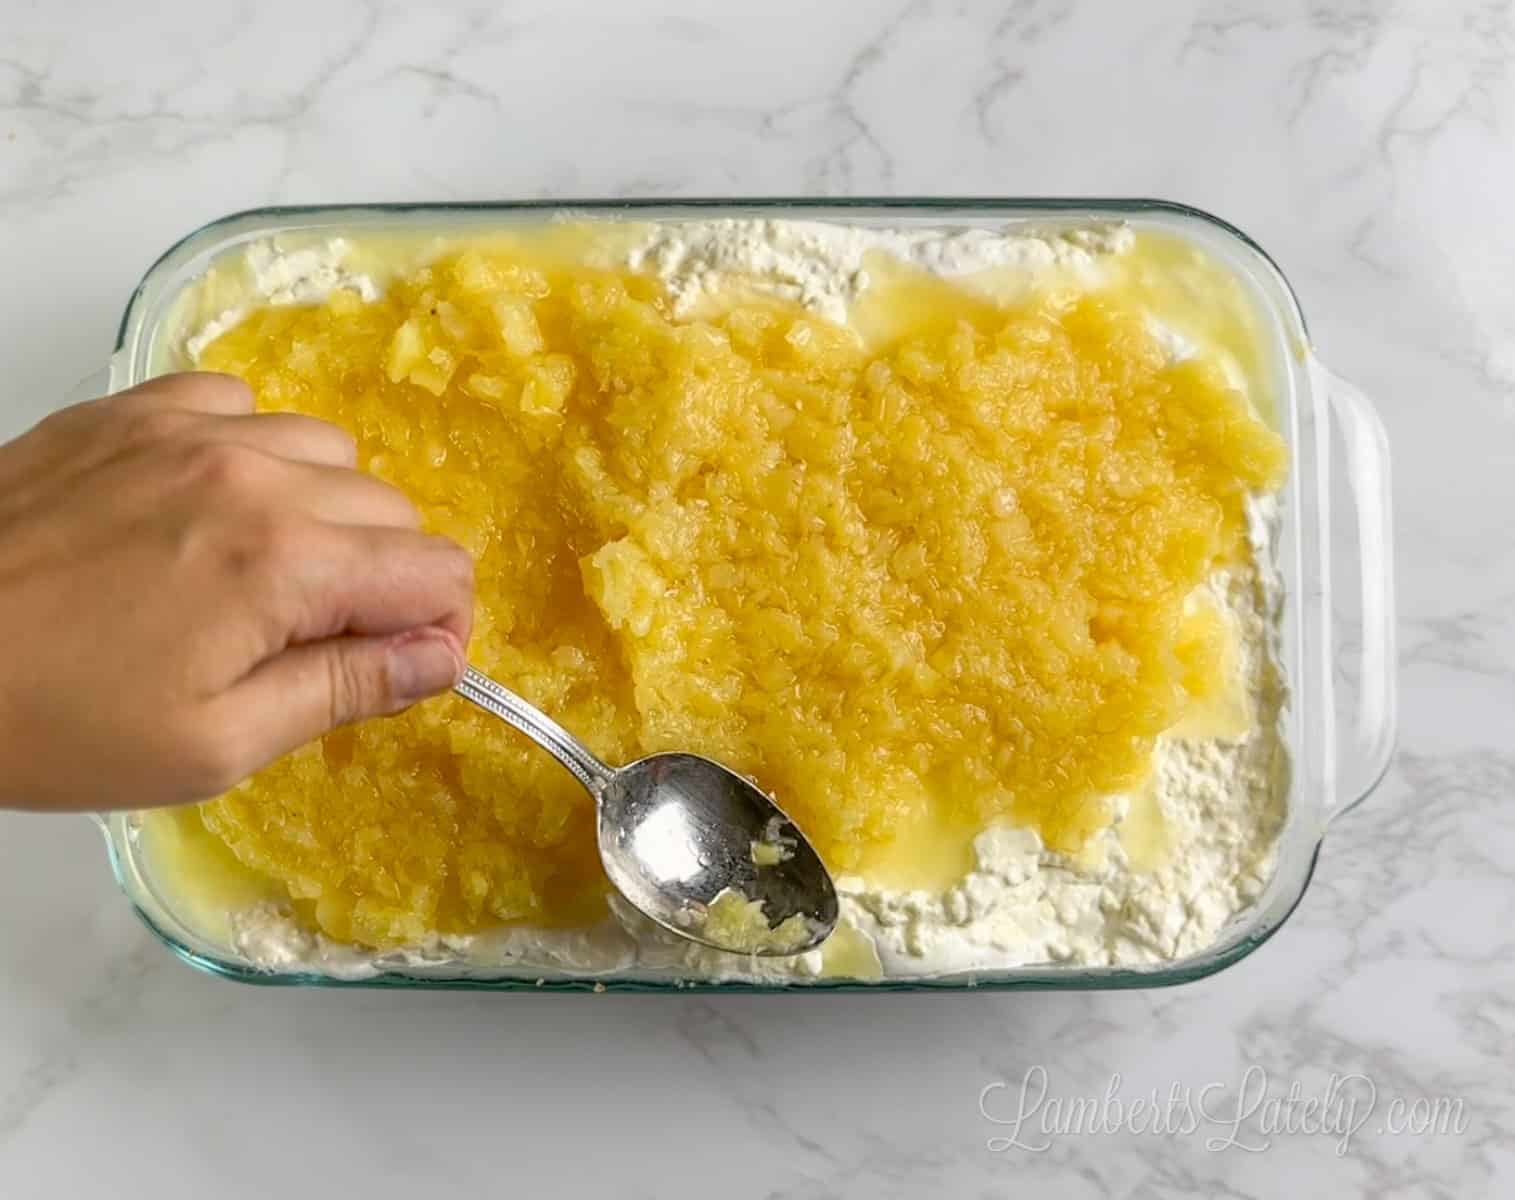
Evenly spread your thoroughly drained crushed pineapple over the banana pudding filling.
Now for my favorite secret weapon trick: lightly lay a clean paper towel directly on top of the pineapple layer before popping the pan into the fridge. Let it chill for 2 to 3 hours. That paper towel is going to work overtime to soak up any leftover pineapple juice so your cake layers stay perfectly intact and don't get watery!
Step 4: Add Toppings Just Before Serving
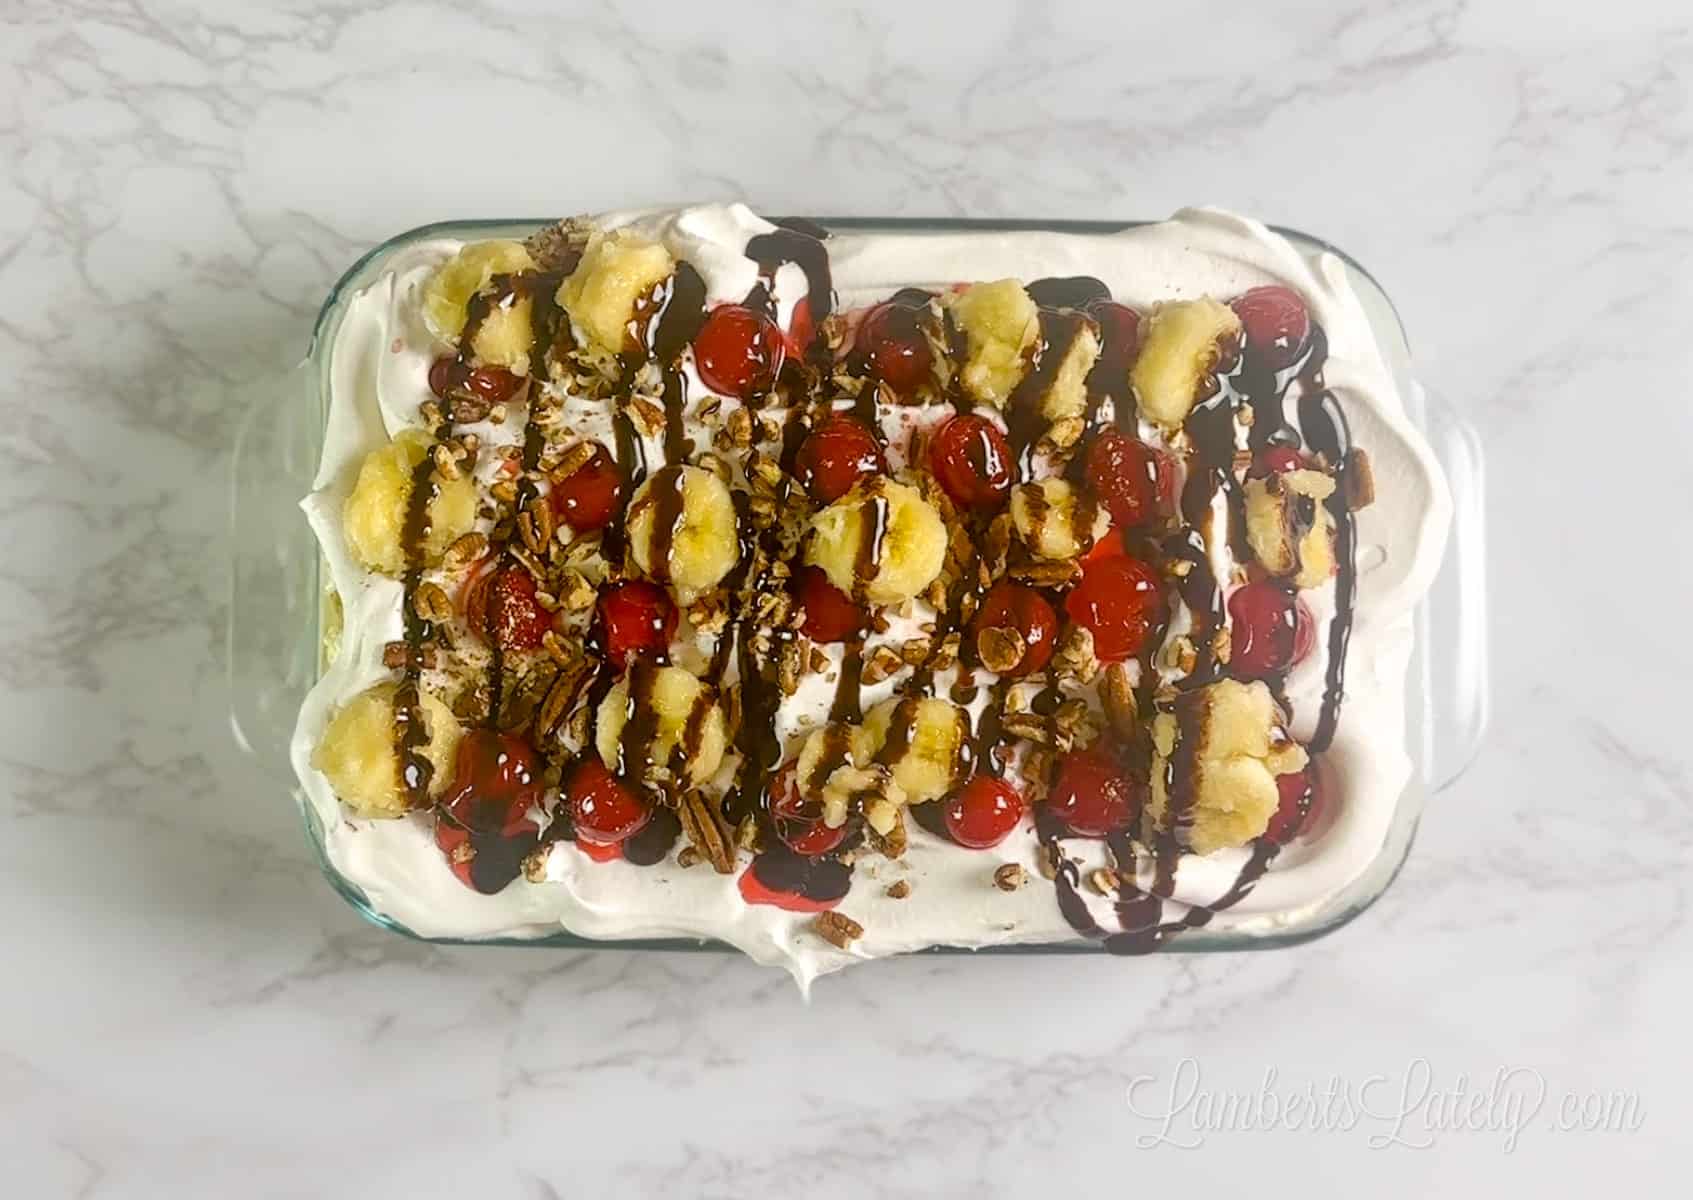
Right before you are ready to serve, gently peel off and discard that paper towel. Spread your remaining tub of Cool Whip smoothly over the pineapple layer.
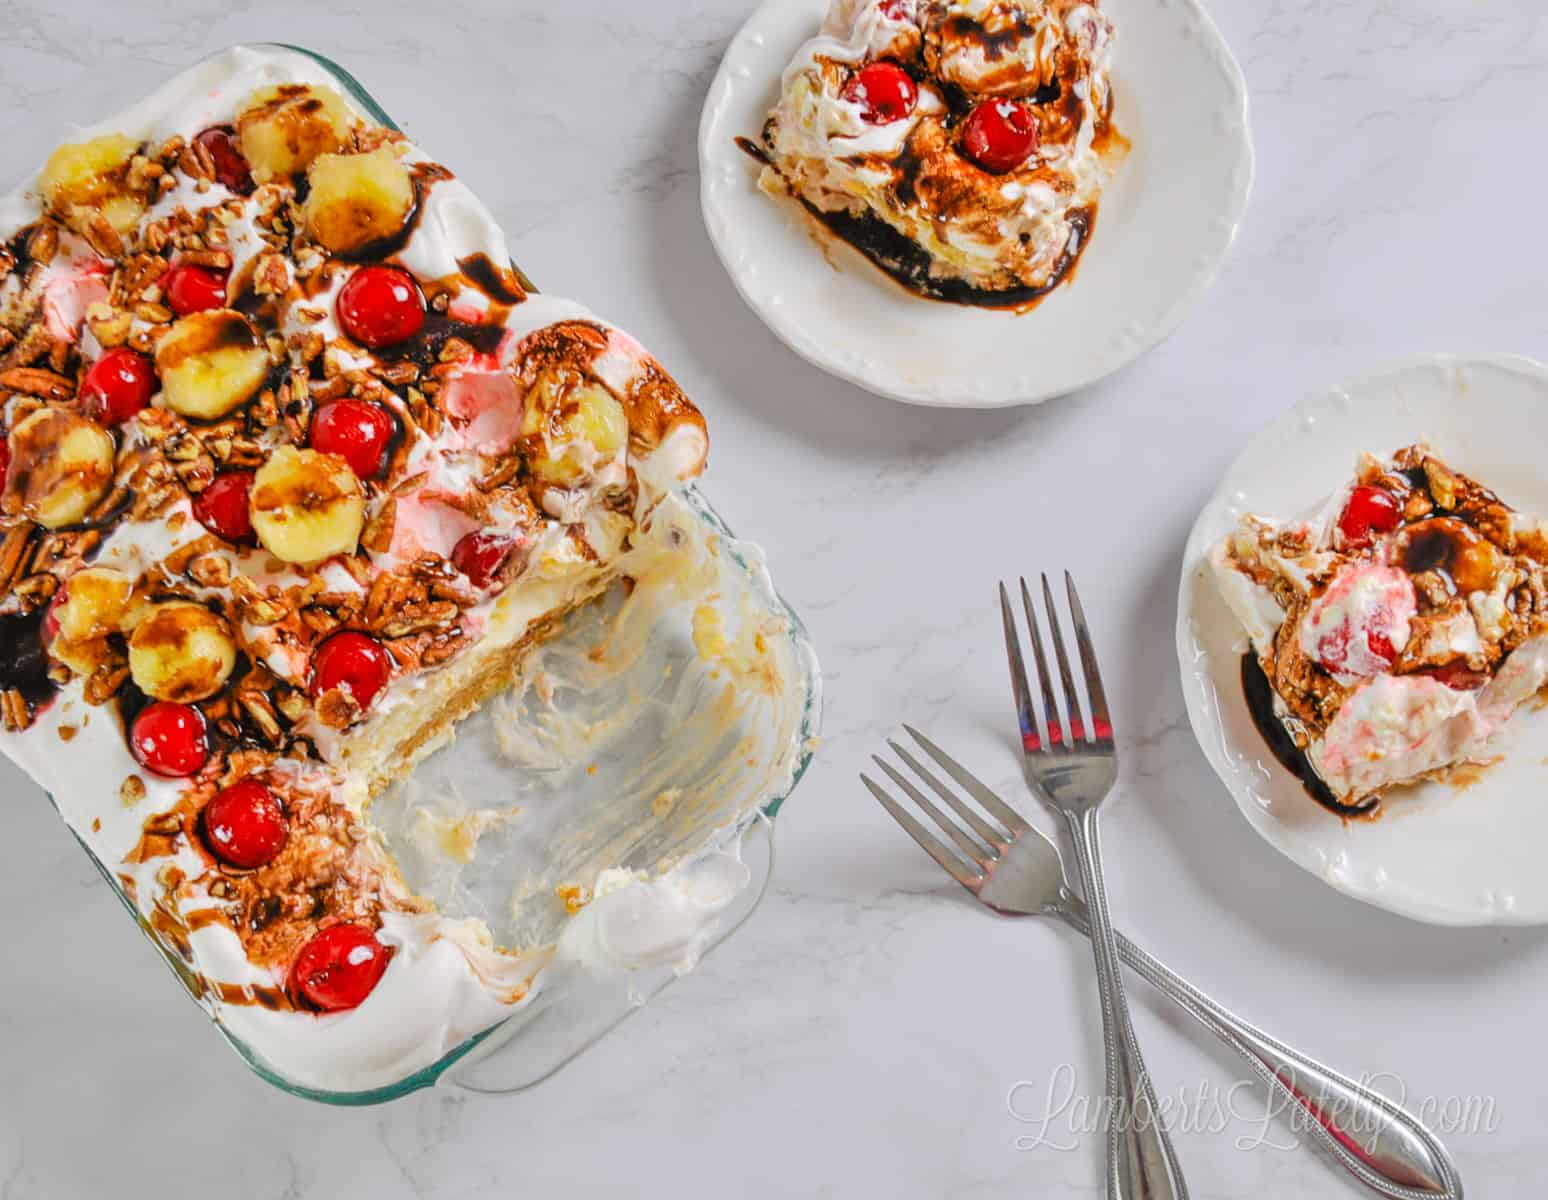
Finally, go crazy with the toppings! Pile on your extra sliced bananas, well-drained maraschino cherries, a generous handful of chopped nuts, and a drizzle of chocolate syrup. Slice it up and watch it disappear!
Storage, Leftovers, & Making It Ahead
If you are planning to make this for a party or find yourself with leftovers, here is everything you need to know to keep this cake looking and tasting completely fresh.
How to Store Leftovers
This recipe stores beautifully in the fridge for 2 to 3 days after you make it. Just make sure to cover the baking dish tightly with plastic wrap or a snug, airtight lid so it doesn't soak up any weird fridge smells.
My biggest tip: Avoid slicing into the cake until right when you are ready to serve it to keep those beautiful layers from running!
Can You Freeze Banana Split Cake?
I do not recommend freezing this cake. Between the bananas, the crushed pineapple, and the pudding layer, there are just too many elements that will get super soggy, watery, and sad during the thawing process. This one is definitely best enjoyed fresh from the fridge!
Making It Ahead for a Party
This is an absolute dream of a make-ahead dessert! If you have a big event coming up, you can easily build the crust and the banana pudding layer the night before. Spread the crushed pineapple on top, pop your paper towel over it, and let it chill in the fridge overnight.
Just hold off on adding the top layer of whipped cream, fresh banana slices, nuts, and chocolate drizzle until right before your guests arrive so everything stays really pretty.
Leslie's Tips for the Perfect Layered Dessert
Want your banana split dessert to look just as amazing on a plate as it does in the pan? Here are my top kitchen-tested tips to guarantee absolute banana split success:
- Chill for Clean Slices: Do not rush the chilling time! Let the cake sit in the fridge for the full 2 to 3 hours so the pudding layer firmly sets and doesn't collapse when sliced.
- Pick Your Baking Dish: I made this in an 11x7" glass baking dish, which makes the layers nice, tall, and extra pretty! If you need to travel and use a snap-on lid, move up to a 9x13" pan so you don't smash your toppings.
- Sacrifice the First Slice: Let's be real - the first slice out of any layered icebox cake is usually a mess. Just use a small spatula to scoop it out as a "chef's sample," and the rest will come out looking picture-perfect.
- Wipe Your Knife: For squares that are nice and pretty, keep a warm, damp paper towel nearby. Wipe your knife completely clean between every single slice so you don't drag pudding across your clean layers.
- Save the Crunch for Last: Always hold off on adding chopped nuts, sprinkles, or crunchy add-ins until right before serving. This keeps them crisp instead of letting them get soft in the fridge.
FAQs & Troubleshooting


I hope you enjoy this fun summertime treat! I want to hear what you think of this Banana Split Cake recipe. Tag me on social media 📸 (@lambertslately) with your recipe pictures, or leave a comment and review ⭐️ below.
No Bake Banana Split Cake
Ingredients
For Graham Cracker Crust
- 2 cups graham cracker crumbs
- 1 stick butter (melted)
- ¼ cup granulated sugar
For Cream Cheese Banana Pudding Filling
- 3.4 oz instant banana pudding mix
- 1 cup powdered sugar
- 1 cup half and half
- 8 oz cream cheese (softened to room temperature)
- 8 oz whipped topping
- 2 bananas (chopped)
Cake Toppings
- 2 bananas (chopped)
- 20 oz canned crushed pineapple (drained well)
- 8 oz whipped topping
- 10 oz maraschino cherries
- ½ cup pecans or peanuts (chopped)
- chocolate syrup
Instructions
For Graham Cracker Crust
- In a medium bowl, mix together graham cracker crumbs, sugar, and melted butter. Press the mixture into the bottom of a 9 x 13" glass baking dish.
For Cream Cheese Banana Pudding Filling
- In a large bowl, whisk together banana pudding mix, powdered sugar, and half & half. Use a hand mixer to mix in softened cream cheese. Fold in 8oz of Cool Whip and bananas.
- Pour banana filling over the graham cracker crust already in the baking dish.
For Remaining Layers
- Spread drained crushed pineapple over banana filling. At this point, lightly cover pineapple with a paper towel and refrigerate for 2-3 hours. The paper towel will help soak up any remaining pineapple juice.
- Just before serving, spead remaining Cool Whip over crushed pineapple. Top Cool Whip with remaining sliced bananas, cherries, nuts, and chocolate syrup.
Notes
- Pudding Type: Use instant banana pudding mix; cook-and-serve will not set up.
- Cream Cheese: Soften completely at room temperature to prevent lumps.
- Moisture Control: Thoroughly drain crushed pineapple; press a clean paper towel on top during chilling to absorb excess liquid.
- Prevent Browning: Toss banana slices in citrus juice before adding to the cake.
- Chilling Time: Chill for the full 2 to 3 days/hours (2-3 hours minimum) so layers set firmly.
- Toppings: Add nuts, chocolate drizzle, and fresh fruit right before serving so they stay crisp and neat.
- Make-Ahead: Assemble the crust, pudding, and pineapple the night before. Add the top whipped cream and fresh toppings right before guests arrive.
- Storage: Keep refrigerated up to 2 to 3 days. Do not freeze, or it will thaw into a soggy mess.
Nutrition Facts

Leslie Lambert is a lifestyle writer and content creator specializing in home organization, family recipes, and intentional living. With 17 years of experience in blogging and digital storytelling, she helps busy women create calm, purposeful homes they love.