
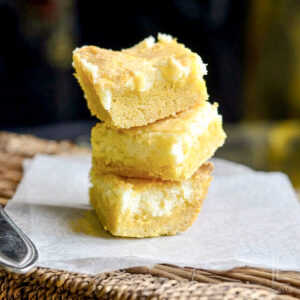
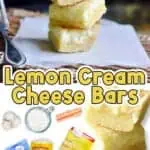
This easy recipe for Lemon Chess Bars uses cake mix and lemonade mix to create a bright, creamy dessert with hardly any effort. With just 6 simple ingredients, you'll get a soft, buttery crust topped with a rich lemon layer that's sweet, tangy, and perfect for sharing.

Why You'll Love This Recipe

If you're a fan of my original cake mix chess bar recipe, you're going to love today's recipe! These Lemon Chess Bars are a super easy dessert recipe that's perfect for summer snacking.
These lemon chess bars combine a soft, buttery cake mix crust with a tangy lemon filling to create a dessert that's rich, sweet, and just a little tart. Best of all, they only take a handful of ingredients and a few minutes of prep.
These bars remind me a lot of my lemon brownies. They have that same sweet-tart lemon flavor everyone loves, but with a richer, creamier texture thanks to the cheesecake-style filling baked over a buttery cake mix crust. They're so simple to make, super soft, and perfect for sharing at potlucks, summer get-togethers, or just keeping in the fridge for a little sweet treat during the week.
In other words, it's an easy, crowd-pleasing dessert that's perfect whenever you're craving something bright and sweet. I hope you love these!

What are Lemon Chess Bars?
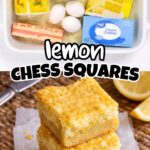
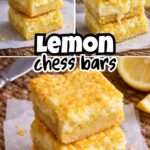
If you've never had this dessert, you're in for a treat! Lemon chess bars are a Southern dessert made with a soft cake-y crust and a creamy lemon filling (almost like cheesecake). These are inspired by chess pie, which has a sweet, custard-like texture. In bar form, that filling bakes into a slightly gooey layer that's sweet, tangy, and actually really easy to slice.
Lemon Bars vs. Lemon Chess Bars
Even though both desserts have that yummy lemon flavor, lemon bars and lemon chess bars are pretty different. Traditional lemon bars have a shortbread crust and a more lemon curd filling. Lemon chess bars are richer and creamier, thanks to ingredients like cream cheese, eggs, and sugar - giving them a texture that's almost like cheesecake.
Ingredient Notes
(See recipe card at the bottom of the post for exact ingredient measurements.)
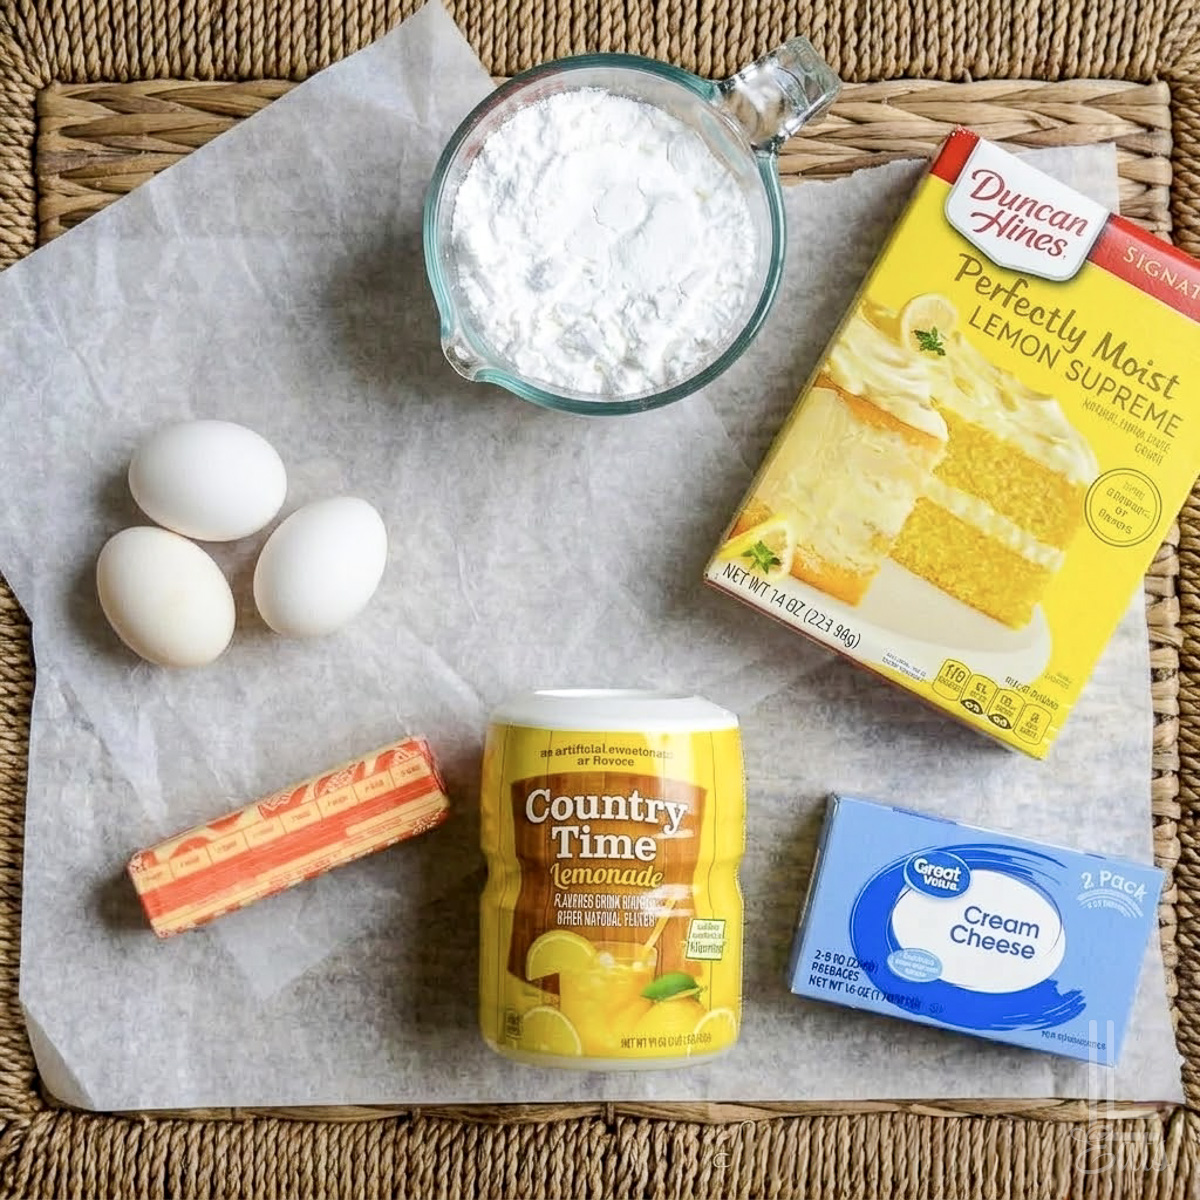
- Lemon cake mix - This creates that yummy buttery crust and adds an extra boost of lemon flavor. One of the best things about this recipe is how easy it is to customize - just swap in another cake mix flavor if you want to change things up. Strawberry, orange, or pineapple cake mix all work well for a fun twist! (See my tres leches with cake mix or my slow cooker peach cobbler for more recipes that use cake mix.)
- Butter - Melted butter mixes easily into the cake mix crust and helps create that soft, chewy base layer. Let it cool slightly before mixing so it blends smoothly with the other ingredients.
- Lemonade drink mix - Make sure to use a sweetened powdered lemonade mix for the best flavor. It adds that tart lemon flavor and sweetness to the creamy top layer without needing fresh lemons.
- Eggs - Eggs help bind both layers of the bars and give the filling its rich, custard-like texture once baked.
- Cream cheese - This gives the creamy top layer its signature cheesecake-like texture. For the smoothest filling, allow the cream cheese to come to room temperature before mixing. Full-fat cream cheese will give the best flavor, but reduced-fat works if you want a slightly lighter option.
- Powdered sugar - Powdered sugar sweetens the filling while keeping the texture silky and smooth. Granulated sugar won't dissolve as well and can make the filling feel grainy, so powdered sugar works best here.
Additions & Variations
One of the best things about lemon chess bars is how easy they are to customize. The simple lemon filling pairs well with lots of different flavors, so you can easily change things up depending on what you have on hand.
- Add fresh or frozen berries. Stir berries directly into the cheesecake layer before baking for a yummy burst of color and flavor. Blueberries, raspberries, strawberries, or even cranberries all work perfectly with the tangy lemon filling. The berries soften as the bars bake and add tasty little pockets of fruity sweetness throughout.
- Boost the lemon flavor. If you really love bright citrus desserts, you can add a little fresh lemon juice or lemon zest to the filling. Fresh lemon zest especially intensifies the flavor and gives the bars a more homemade lemon taste.
- Dust with powdered sugar. Once the bars have cooled off completely, sprinkle a light layer of powdered sugar over the top before slicing. It gives them a that bakery-style finish and adds just a bit of extra sweetness.
- Add a sweet glaze. For an extra lemony finish, drizzle the cooled bars with a quick glaze made from powdered sugar and a little lemon juice. It adds another layer of citrus flavor and makes the bars look extra pretty for serving.
Why Use Cake Mix for Lemon Chess Bars?
Cake mix makes these lemon chess bars incredibly easy to make! It creates a soft, buttery crust with just a few ingredients, cutting down on prep time while still giving you that rich chess bar texture.
It's a simple shortcut that makes this dessert beginner-friendly without giving up big flavor.
(If you love bright, fruity recipes, you'll want to check out my easy fruit dip and cake mix pancakes recipes, too!)
How to Make Lemon Chess Bars
- Prepare the cake crust. In a medium mixing bowl, combine the lemon cake mix, one egg, and melted butter. Stir until a thick dough forms - it should have a texture similar to soft cookie dough. Press this mixture evenly into the bottom of a greased or parchment-lined baking dish, making sure to spread it all the way to the edges so the crust bakes evenly. Set the dish aside while you prepare the filling.
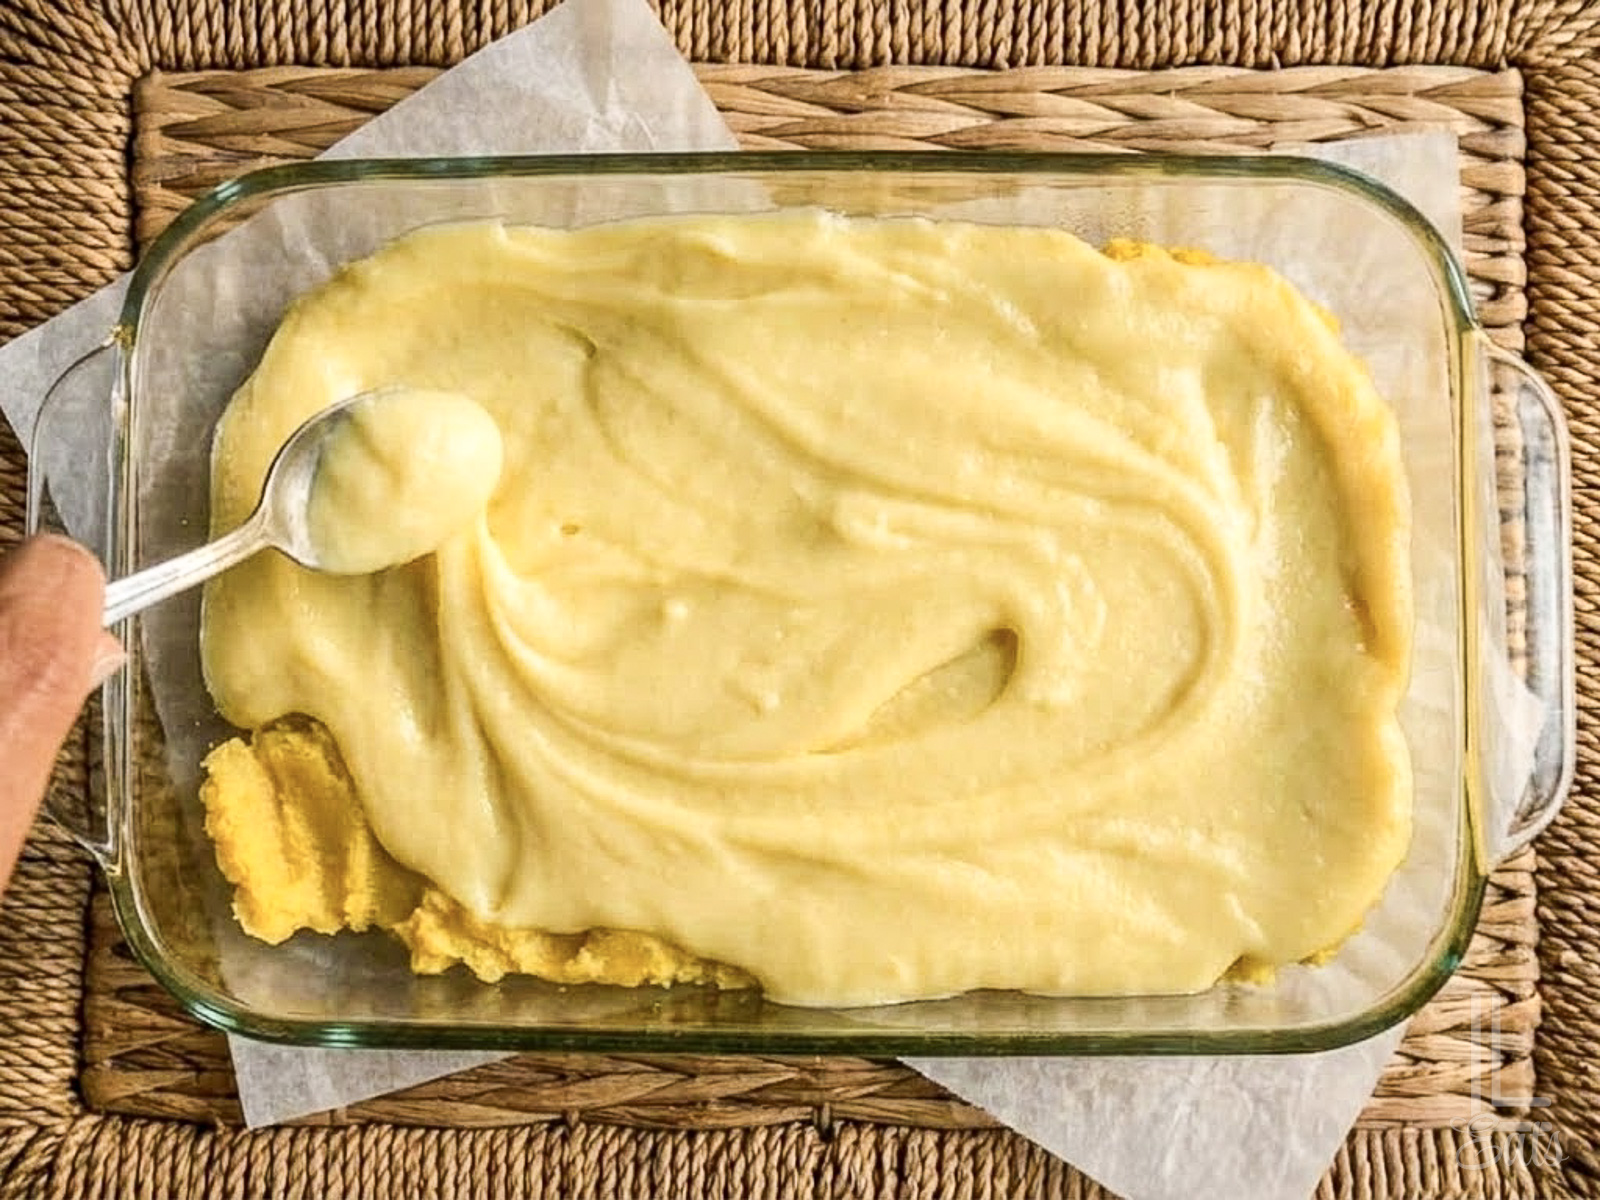
- Make the lemon cream cheese filling. In a large bowl, beat the softened cream cheese with a hand mixer until it's smooth and fluffy. Add the powdered sugar, lemonade mix, and remaining eggs, then continue mixing until the filling is completely smooth and creamy with no lumps. Pour the lemon mixture over the prepared crust and gently spread it into an even layer.
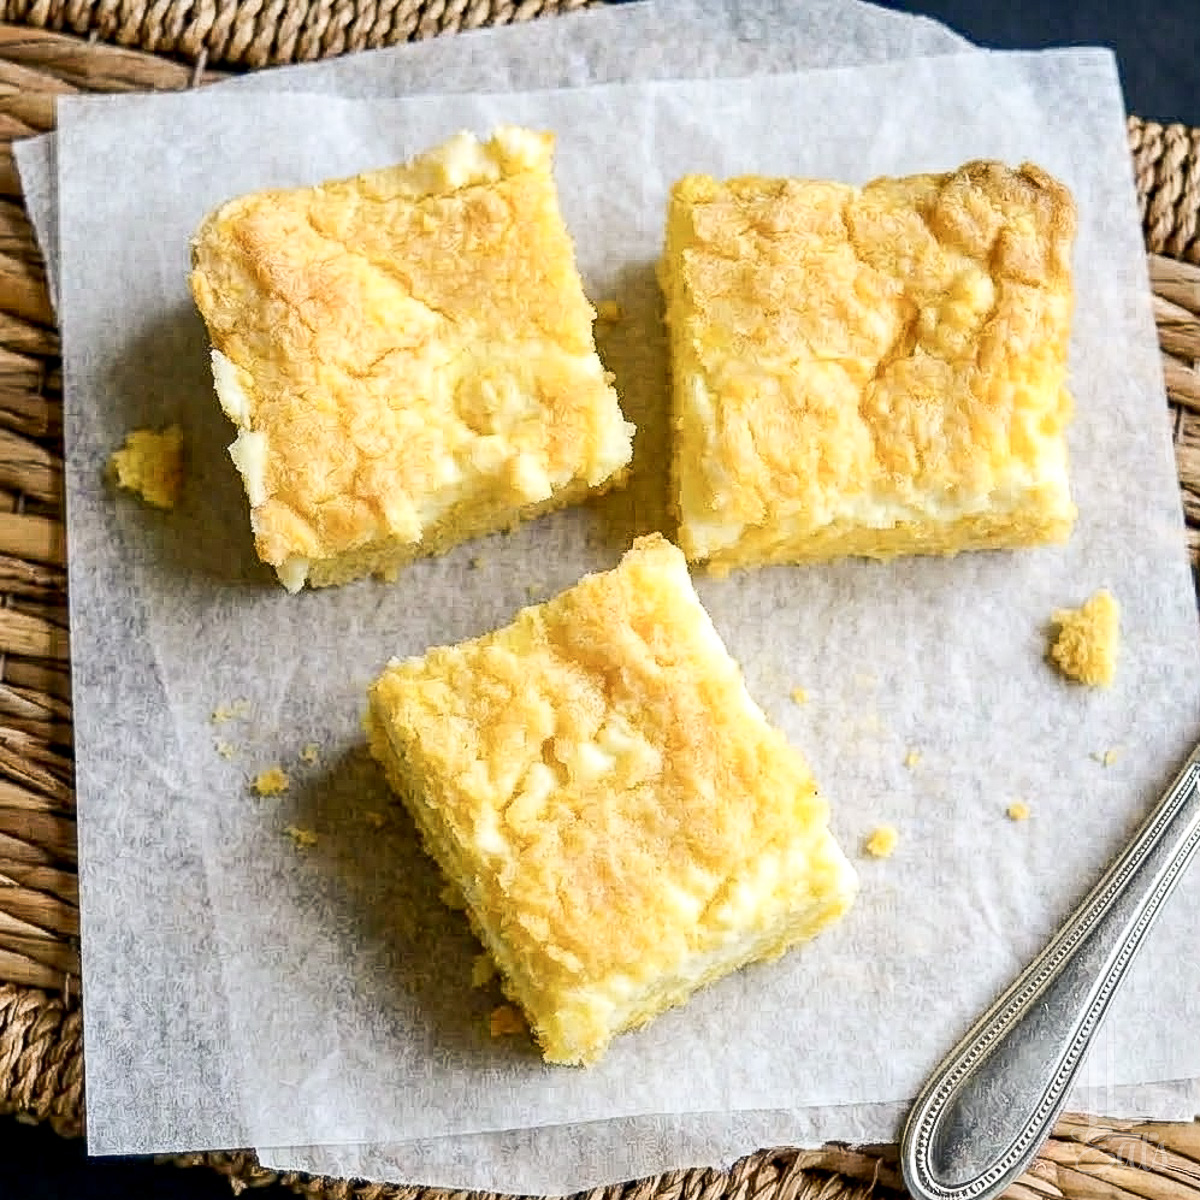
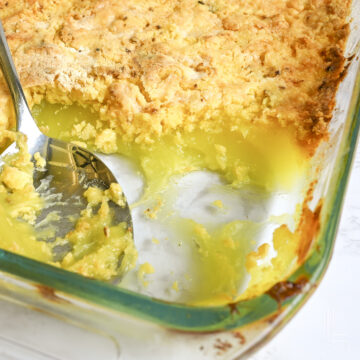
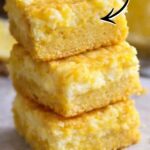
- Bake chess bars in a 325°F oven for 35-40 minutes, or until the top is lightly golden and the filling is mostly set. The center may still be a little jiggly, which is totally normal - the bars will continue to firm up as they cool. Avoid over-baking...this can make the filling less creamy.
- Cool and chill before slicing. Let the bars cool at room temperature for about 30 minutes, then transfer the dish to the refrigerator. Chill for at least 3-4 hours before slicing to allow the layers to fully set. Once the bars are chilled, cut them into squares and serve.
Step-by-Step Recipe Video
Leslie's Helpful Tips & Tricks
- Make sure to spray your baking dish with cooking spray. These will stick!
- Before cutting the lemon bars, allow them to cool in the fridge for a few hours. Use a sharp knife to make the bars' edges smooth. Fill a bowl with warm water and dunk your sharp knife in the water before cutting each bar. I prefer to chill my bars before cutting so those edges are neat.
- Make sure you don't bake too long. Over-cooking will dry out that luscious creamy cheesecake layer - nobody wants that. These should be pulled when the top just starts to brown.
- I used a 7x11" glass baking dish for this recipe; you can use 7x11" or 8x8" glass dish for thicker layers. For thinner layers, use a 9x13" dish.
- Because of the cream cheese filling, you'll want to store any leftover lemon bars in the refrigerator after serving. Cover them and place them in an airtight container when storing. These should last 3-4 days in the refrigerator.
- This recipe can be frozen as well. Bake as instructed, wrap bars tightly with aluminum foil and plastic wrap, and freeze for up to 6 months. When you're ready to serve them, simply thaw them in the fridge and enjoy!
FAQs & Troubleshooting

Making this recipe? I'd love to see it! Make sure to tag me on social media 📸 with your results (@lambertslately). I'd also love it if you gave this recipe a rating ⭐️⭐️⭐️⭐️⭐️ and a comment 💭 to help other people find it.
Lemon Chess Bars
Ingredients
For the Cake Layer
- 1 box lemon cake mix (15-16 oz)
- 1 stick butter (melted)
- 1 large egg
For the Lemon Cream Cheese Layer
- 8 oz cream cheese (room temperature)
- 3 cups powdered sugar
- 1 cup sweetened lemonade drink mix
- 2 large eggs
Instructions
- Preheat oven to 325°F.
- Combine the lemon cake mix, 1 egg, and melted butter in a medium mixing bowl. Stir until a thick dough forms, similar to soft cookie dough. Press the dough evenly into the bottom of a greased or parchment-lined 7x11" glass baking dish.
- In a large bowl, beat the softened cream cheese with a hand mixer until smooth and fluffy. Add the powdered sugar, lemonade mix, and remaining eggs. Continue mixing until the filling is smooth and creamy with no lumps.
- Pour the lemon filling over the prepared crust and gently spread it into an even layer.
- Bake at 325°F for 35-40 minutes, or until the top is lightly golden and the filling is mostly set. The center may still jiggle slightly.
- Allow the bars to cool at room temperature for about 30 minutes.
- Transfer the dish to the refrigerator and chill for 3-4 hours, or until fully set. Slice into squares and serve.
Notes
- The center may still jiggle slightly when removed from the oven - this is totally normal and will set as it chills.
- Avoid over-baking to keep the filling creamy and soft.
- Use room temperature cream cheese for the smoothest filling.
- Make sure to use sweetened powdered lemonade mix for the correct lemon flavor and sweetness.
- Grease or line the baking dish well to prevent sticking.
- Chill completely before slicing for clean bars and the best texture.
- Use a sharp knife (wipe between cuts) for clean slices.
- Store leftovers in the refrigerator due to the cream cheese filling.
- Bars can be made ahead and freeze well for longer storage.
Nutrition Facts

Leslie Lambert is a lifestyle writer and content creator specializing in home organization, family recipes, and intentional living. With 17 years of experience in blogging and digital storytelling, she helps busy women create calm, purposeful homes they love.


This is exactly the type of recipe I love. These bars look incredible!
These bars look so, so yummy!!
I'm with you on struggling to resist the leftovers - fortunately I have 6 other mouths in my house so leftovers don't last long around here! These look delicious!
I was wanted to know if you make the cake first or do you just spread the mixture?
No, you won't make the cake as directed on the box. Just use the cake mix as an ingredient in the recipe!