
Over the past year, I've been on a mission to declutter this house. I've written about it a little before. It was one of my goals for last year and I've chronicled a little bit of that journey along the way. But, quite possibly the biggest area where we needed to declutter was in the clothing department.
Up until last year, I saved almost every single piece of clothing Emmie ever had, just in case Jackson ended up being a girl. We had boxes upon boxes (upon boxes) of every kind of girls' clothing imaginable. Well obviously he wasn't a girl, and we don't really have a need for girls' clothing anymore, so the little girl clothing has to go! Since early this year, I've been (sort of slowly) getting rid of just about every piece of clothing Emmie has ever owned. I have one box of sentimental clothing for her...and that's it!
I've had some luck with consignment sales, but the best way I've found to sell kids' clothing is on Instagram. My sale page has been an invaluable resource for networking with other moms that buy kids clothing and organizing my "stash."
Looking to unload a few items and make a little spare change yourself? Check out how I have made my Instagram sale page efficient and successful!
(Affiliate links used in this post.)
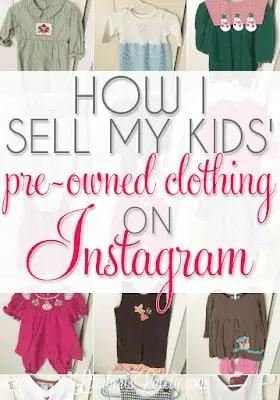
How to Sell Baby & Kids Clothes on Instagram
1. Set up your Instagram account.
This step is simple; go to Instagram on your phone, click on your profile (the button on the bottom right of your screen), click the tool icon in the top right, and at the bottom, you should see an option for "add account." Instagram lets you easily switch between accounts without signing in/out of each one, so having a different account for your clothes sales on your phone is so easy!
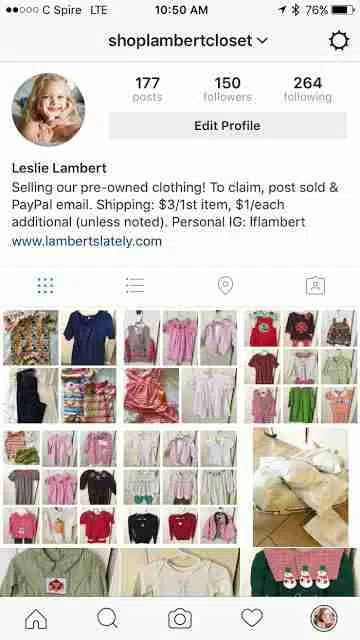
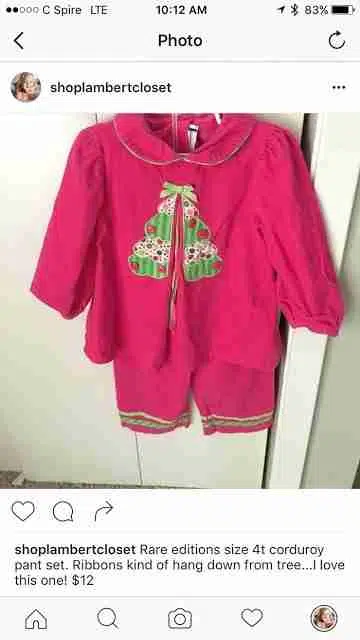
As you're setting up your shop page, I suggest putting your policies in your profile. I list how to let me know you want to buy clothing (by commenting "sold" and listing your paypal address), my shipping fees (more on figuring that out later), and my other Instagram page. Some sellers like to list a hashtag that references their policies too, which is an awesome idea if you have a few rules that won't fit in your bio.
2. Advertise your new page on your other social media (but don't get spammy).
If you don't tell anyone about your clothing sale page, who will know it is there? I put a post on all of my social media pages (Facebook, Instagram, and Twitter) about my new sale page when I made it. But, I wouldn't recommend more than a couple of posts on each one...if people want to check it out, two or three posts should be plenty to let them know about it.
3. Get your clothing organized (by size and season).
Now comes the time-consuming part: figuring out what you're going to sell and when.
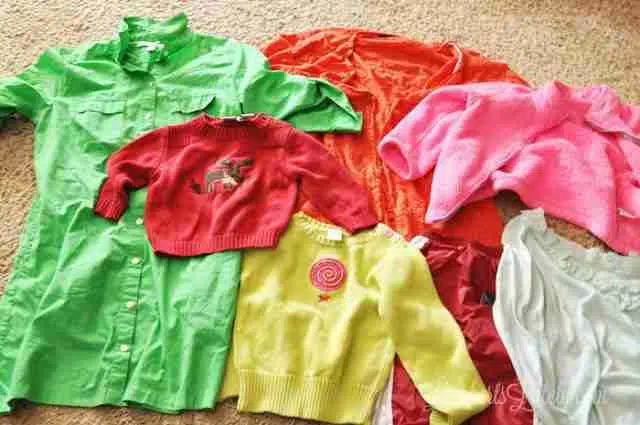
First, if my clothing has been in storage for awhile, I like to give it a wash. Treat stains (OxiClean is my favorite for this) and hang the clothing as soon as it comes out of the dryer so you don't have to iron most things! I have also recently started using this scent booster...just a little bit gives clothes a fresh smell, and this one is ok to use with baby clothes. Then, the easiest way to do it, in my opinion, is to make stacks of clothes by sizes.
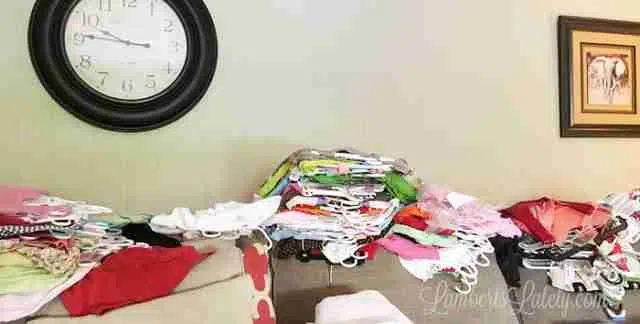
It is the best way I've found, but it's definitely messy! 🙂 I make two stacks for each size; one for warmer weather and one for colder weather. The best time to sell the warmer weather stuff is usually in late February/early March (about the time of consignment sales). I like selling colder weather items in late August/early September. I've had the most success listing items around these times!
Once you have everything sorted, you'll probably have a zillion stacks of clothing all over. If that drives you crazy like it does me, a portable garment rack is worth its weight in gold.
4. Get clothing presentable.
I'll admit, this is an area I sometimes overlook. If you're like us, you probably have so many pieces of clothes that it can be tempting to forget the little details. But, a few really easy steps have proven to get me a few extra dollars when selling on Instagram:
- Make sure clothing is centered (not hanging off one side) on the hanger.
- Smooth down collars and hemlines so the entire outfit hangs flat.
- Make sure the entire outfit (including sleeves) is shown in the picture.
- Smooth out (or iron out) any wrinkles noticeable in the picture (I don't really worry about making sure the piece is perfectly ironed...you're hopefully about to put it in a shipping bag, after all!)
- If you're selling pants, lay them out flat and show the bottom of the pant leg to present any wear.
5. Take pictures of your clothing in a well-lit, presentable area.
I like to use natural light to take pictures of my clothing...it tends to capture the colors of the pieces in the truest form. I probably could take pictures with my DSLR, but ain't nobody got time for that...an iPhone works just fine, I promise.
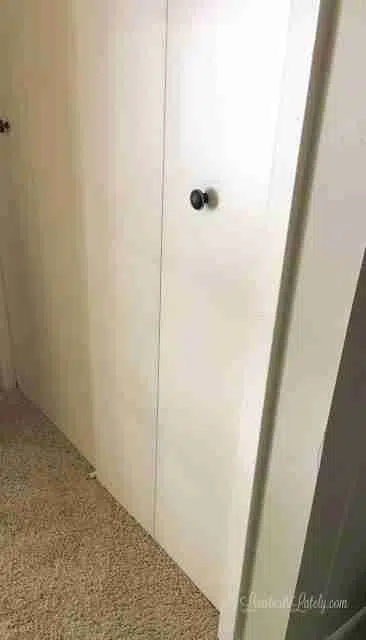
My pictures are taken on a light-background, solid-color closet door in my home that gets great natural light. Most everybody has at least one place in their home like this...search around and see what you can find.
If nothing else, taking pictures on a white sheet or piece of poster board on the ground can work. Don't forget to take up-close pictures of details you want to feature or damage you need to disclose to your buyers!
6. Crop pictures and brighten as necessary (but don't over-brighten).
Once your pictures are taken, go through and quickly crop out any unnecessary items in the shot and brighten if the pictures look a little too dingy. I don't have a particular app I use to do this; the edit feature on the iPhone does the trick. But careful with the brightening tool...too much of it can change the colors of your clothing in the pictures.
7. Price your clothing.
Now this is super tricky if you've never shopped secondhand before, but you will eventually get the hang of it after a little bit of research and some trial and error. There's not a set formula for what you need to charge for secondhand clothing, but the general rule is to price clothing in good condition at 25-35% of the original price.
That means the price you paid, not the (typically over-inflated) original price of the clothes. Of course, this is subject to change; I normally price clothing that is new with tags at 50-75% of my paid price, and damaged clothing (depending on the degree of damage) at 15-20%.
Remember, if you over price your clothing at the beginning you will typically chase away prospective repeat buyers, so don't get too greedy! Think about the price you would pay if you were buying that item.
Your set price also depends on how quickly you're looking to get rid of your clothing. I usually just want to sell it quickly, so I tend to price on the lower end. If you have the patience (and storage space) to price it higher, go right ahead!
8. Post to Instagram.
Finally, you get to list your items for sale!
When I list, I put the size, a brief description, any noticeable damage/features, and the price in the listing. When you're talking about any damage or noticeable features, be honest...your buyer will eventually find out about that damage, and trust me, you'd much rather they know before they buy than after they receive it! You might even want to list a separate picture of damage if it is noticeable.
I recommend listing your items in order of size to make for easy browsing. If you have any seasonal/holiday/team clothing, it's a good idea to list that together too.
I try to post my sales around 7-8pm at night or on weekend afternoons. They tend to get the most visitors when posting during this time.
I also like to use hashtags to promote my listings...this has gotten me a ton of new visitors! A few of my favorites are #kidsresale, #boutiqueforsale, #smockedforsale, #instasale, #instashop, #secondhand, #kidsconsignment, #smockedresale, #smockedclothing, #forsale, and #preowned. If you have a bigger name brand of clothing, include that hashtag as well. I usually put these in the comments so they don't jumble up the listing.
9. Use Paypal to invoice.
Now that you've gotten some sales, get that money! 🙂 Most Instagram shop accounts use Paypal to invoice for their sales. It's by far the easiest way I've found to manage the payment part of shopping on Instagram. Not only does everyone have a Paypal account, but they make invoices super easy!
To invoice on Paypal:
1. Click "manage invoices" from your Paypal main page.
2. Click "create new invoice."
3. Input your buyer's email address, individual items, shipping price, and payment/shipment policies. You can save this as your default clothing invoice by clicking "save" at the top of the page (this will save a ton of time later).
I recommend invoicing this way instead of simply requesting the money from your buyer because it spells out which items you're agreeing to ship them...this helps so much in keeping everything organized!
10. Be ready to ship.
You've got to get the clothes to the customers, right? It's pretty customary to get your items in the mail within a couple of days of payment. As I mentioned earlier, I have my shipping policy right in my Instagram profile.
I charge $3 for the first item and $1 for each additional item. This usually ends up being pretty accurate for what it really costs to ship these items, including all supplies I use to ship. If you have heavier items (like shoes, coats, or jeans) you might want to consider charging more or writing that extra cost into the price of your item.
If you're selling mostly kids' clothes, I recommend a combination of these bigger mailing bags and these smaller mailing bags. I use the smaller ones for 1-2 items and the larger ones for 3-5 items (most of your orders will be in one of those two sizes).
Even when packing orders, presentation is everything...I like to wrap my clothing in tissue paper to protect it (just grab a pack at the dollar store), make sure to fold clothes neatly, and place shoes or bulky items in zip bags. If you're selling something that is new with tags, make sure to protect the tags so they don't fall off during shipping!

Paypal also offers shipping label purchase/printing when you use their invoicing service, so it is incredibly easy to arrange shipment right from there. Just click the "print shipping label" link once your customer pays their invoice.
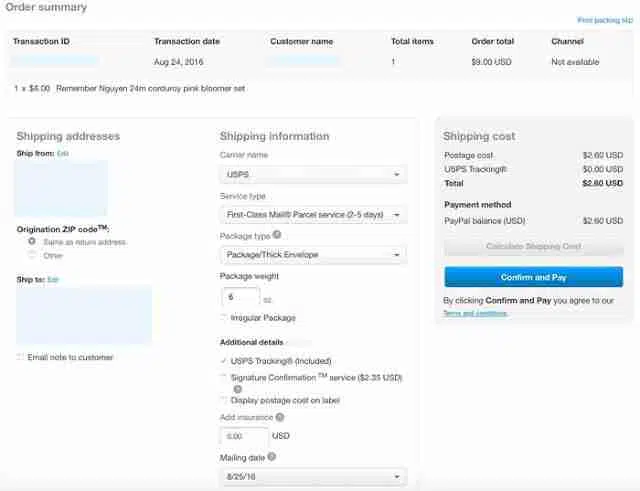
Then, all you have to do is input the package weight and how you want to ship. I have a similar shipping scale to calculate weight that has been beyond valuable over the years...it's definitely a worthwhile (and inexpensive) investment if you're going to be selling anything online. The Paypal input only takes whole numbers for the ounces, so if in between ounces, I always round up.
I've found that if you can ship USPS first class (up to 13 oz), that's usually the cheapest option. Any more than 13oz and you're usually better off shipping Priority Mail (typically it's about the same price as Parcel Post, so you might as well send it Priority).
From there, click "confirm and pay" and USPS takes the money for the shipping label right out of your Paypal account. You can print the label yourself using these label half sheets (I bought a pack years ago and I use them for so much...they're good for shipping labels, but they're also wonderful if you need to print something on sticker paper!).
You can even schedule a package pick-up through Paypal! Click the "request free carrier pick-up service" option at the bottom of your label confirmation page to do that (you can also go to this website). I'm telling you, Paypal is the way to go if you sell on Instagram...they take care of everything.
11. Archive sold clothing.
Archiving all of the clothes I've sold in my Instagram account helps me stay organized. As I'm packing items up, I take a screen shot of the things I just packed and then delete the listing. After I'm done packing for the day/week, I go into my collage app (I use POTO) and make a big collage of everything that's sold.
When I post that collage photo on my Instagram account, I use the hashtag #shoplambertclosetsold so buyers can easily see everything that is no longer available (just in case they were interested in something). That way, you can still see what was there, but it's no longer cluttering up the listings you still have!
12. Have some kind of end date.
I don't know about y'all, but clutter just makes me itchy. You have to realize that, eventually, it's just time to donate things that haven't sold so they aren't cluttering your home anymore. My end date is our local consignment sale. I put my items on Instagram about a month before I have to drop off for that sale. If they don't sell on Instagram and they don't sell at the consignment sale, it's time to donate!
So wow...that's a lot. There is definitely a good bit of effort that goes into doing all of this. But once you get in the groove of how you want to manage your sales and inventory, it really isn't that difficult! Now go make a little extra money! 🙂 (And if you'd like to see an example of how I do it, click here for my Instagram sale page!)

Very interesting !